Thursday, September 29, 2011

Life...

...can be very busy, have you noticed? So forgive me for the infrequent posts. At some point, when little miss realizes she won't starve if she isn't fed every two hours, I'm sure I'll find a few more minutes in the day to work on things.
      These little critters remind me to enjoy life in the midst of being busy. I love to watch them play, and chase each other out my front window.


      And this little critter reminds me to see the wonder in regular old life...even if its just an old seed pod.


      I hope you're enjoying life today...even if it is crazy!

Habakkuk 3:18 Yet I will rejoice in the LORD, I will joy in the God of my salvation.

Monday, September 26, 2011

Asymmetrical Skirts

      I have tons of furniture painting projects I am dying to get to now that I can walk outside without feeling like I might instantly roast into oblivion... and I'm not pregnant anymore. However, there is a lovely little phenomenon that happens every fall here in the south called "love bug" season. No, it doesn't mean you suddenly feel like hugging everyone. Dreadful little flying black bugs descend in clouds and clog the air with their awful little selves. To paint anything outside automatically will ensure your masterpiece will be black polka dotted with the monsters. So, I will save my painting for a few weeks and share a few sewing projects in the mean time.


      If you've done any sewing at all, I'm sure you've made a circle skirt or two in your time. They are so appealing because they wonderfully easy, and they flatter most any body shape. These skirts are the twin of circle skirts, however, you use a rectangle instead of a circle. They drape longer at the sides, and I think, look best when using striped material...but I'm rather infatuated with stripes so feel free to ignore that bit.


      I made both of these with jersey knit fabric.  Here is how you do it. Start with your fabric folded in half. I wanted the stripes going vertically, so I put the fold at the top. Just make sure the stretch of the fabric is going width wise.


      Measure 16 inches in from the edge on the fold and put a mark on the fabric. From that mark, measure you waist measurement divided by two and subtract 4 inches. Then measure another 16 inches. So sorry if that is confusing...16 inches, waist/2 -4 inches, 16 inches. Cut the fold apart in a slit only where you marked the waist measurement.


      Now measure 16 inches down from the fold and cut the bottom edge. You will have a long narrow rectangle with a fold at the top with a slit cut in it. Fold your rectangle in half.


      Round out the corners just slightly.


      Now cut out a waist band. I made mine a fold over yoga pant style waistband. To do that, subtract 2 or 3 inches from however long the waist slit was and cut the waistband that long. I made mine 14 inches tall so that when it was sewn to the skirt it would be 7 inches.


      Sew up the sides of the waist band.


      Fold it over on itself, so the right sides are facing out.


      Put it inside the slit you made on the skirt. (make sure the skirt if wrong side out)


      Sew it on, making sure to stretch out the waist band to match the width of the waist slit as you go.  That's all there is to it. I didn't do a thing to the edges of the skirt since I used jersey. Here the waist is folded down.


      And here it is up.


       I love how, if you do it with stripes, the stripes appear to be going horizontally on the sides, although no sewing was actually done on the sides.


         I think these are very comfy and chic skirts and very fun to sew.


      Of course, If you aren't the sewing type...these two will actually be for sale in my...ahem...Etsy shop that hopefully...gulp...will be open at the end of October. I've been thinking about a shop for ages, so, well, mine as well do it already. I'm shooting for the end of October and have been sewing my little fingers off, so we shall see. Gotta have goals right? If any of you experienced gals have any tips to share on that particular subject, I'd be eternally grateful to hear them!

Psalms 37:3 Trust in the LORD, and do good; so shalt thou dwell in the land, and verily thou shalt be fed.

linking to:
Confessions of a Stay at home mom
Home stories A to Z
Sugar Bee Crafts
Not Just a Housewife
My Girlish Whims

Thursday, September 22, 2011

Fall decor makeover

      Do you have a tub full of Fall decorations that looks something like this?


      Mine is mostly Dollar store type stuff....entirely too much orange and entirely too overly used looking. I decided a new Fall look was in order...except I didn't want to spend money on it and I really didn't want to take babies out to go get any. What to do, what to do...spray paint naturally. I took some of this lovely stuff and went to town.


      I spray painted all my orangeness, but let a little of the color show through still.


       Ahh, so much better. I took these little wreaths...


      ...and doused them with silver paint. Ya, ya, I know, silver isn't a fall color...but I'm already breaking all sorts of decor rules, mine as well continue. I do believe I approve of my new look.


     I wrapped the candles with upholstery webbing and put a few fallish colored berries through it to give a bit of color.  The banner I made last year out of burlap and jute.


      I also took some paint to this dollar store plastic tray.


       It makes quite a lovely centerpiece for my table.


      I made these blessing blocks last year out of scrap 4 x 4 pieces. I suppose its a bit early for Thanksgiving stuff...but, being thankful doesn't need to be limited to one month out of the year anyway!


      I must say, it was a bit hard to get in the Fall mood while sweating and slapping mosquitoes while spray painting. Oh well, its the thought that counts.


      Spray paint is a fabulous thing, it makes me happy.

Romans 8:28 And we know that all things work together for good to them that love God, to them who are the called according to his purpose.

Tuesday, September 20, 2011

Sewing tip - French Seams

     Have you ever made something that looked like this after you wore it?


       So sad looking. Some fabrics just don't handle stress on seams very well. One way to avoid the  above tragedy, is to do a french seam when you first sew the garment. Being the hasty person I am, I balk at the thought of an extra step, but, it will save you time repairing a garment over and over again in the long run.
     Start with your fabric RIGHT sides out, and sew down the sides. You'll have to ignore the inner voice screaming at you to stop sewing on the right side...habits are hard to break.


      Now flip it wrong side out, and sew along the seam you just made. It will enclose the seam so no raw or sewn seams are visible.


      Just a few extra minutes makes it so much sturdier and well made. Just for the record, I fixed the skirt above by serging along the side, and then dousing the whole seam line with fray check. I have since worn it with no problems. If you have some doubts on the ability of your fabric to hold a seam, sew two scraps together and try to pull them apart. That should help indicate if a french seam is needed.
     Don't forget to add a little extra seam allowance if you plan on doing this!


"And all things, whatsoever ye shall ask in prayer, believing, ye shall receive. "
Matthew 21:22

Saturday, September 17, 2011

Satin Sash Bag


      I always think of sewing in relation to shapes. Most everything can be simplified down to a series of basic shapes connected together. Simple minds can only handle simple concepts I guess. Anyway,  I was mulling over something quick and simple I could throw together for a fall/winter purse while I was having to sit still to get my hair done the other day. An idea popped into my head to make a bag from a circle.


      I tried out my theory later that day at dinner at Olive Garden on one of those cardboard coasters they give you...and decided my idea was worth trying. (and pretended my 2yr old was the one who messed up the coaster) I chose grey suiting fabric for the outside, and black satin for the inside. It has a bit of an academic vibe...

  
     ...mixed with a bit of an artsy touch...


     ...and every bit classy.


     Have I sold you on making one yet? It isn't hard, promise. To start, you are going to need three circles, one lining, one outer fabric, and one of interfacing. To make a circle, fold the fabric in half.


      Fold it in half again. This leaves you with a corner, four layers thick and folds along the edges.


       Starting at the corner, mark out 18 inches along one edge.


     Hold your finger on the corner and continue marking out 18 inches in an arc until you get to the other fold.


    Cut out along your marks.


     Open it up and you have a perfect circle 36 inches across.


      I used lightweight interfacing between layers.


     I had to cut this out in sections because it came in narrow strips.


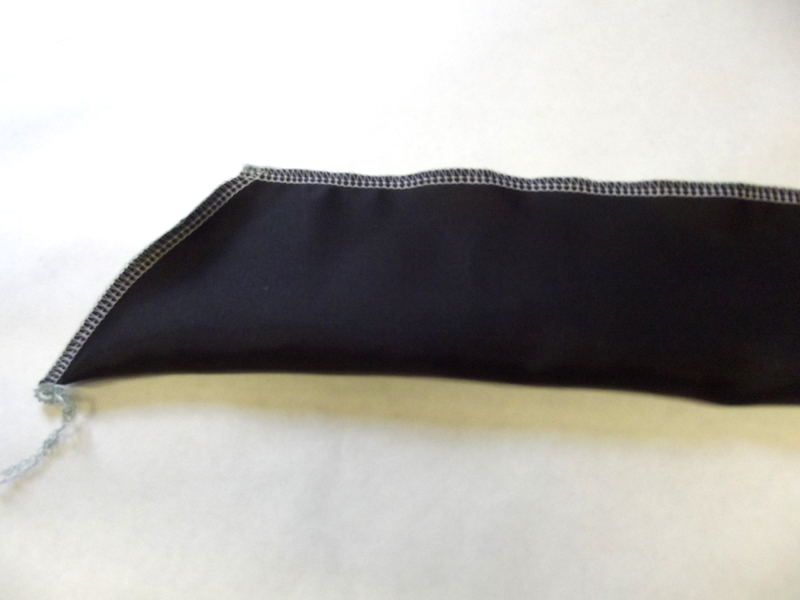
     Along with your three circles, you will also need to cut a strip 22" x 7" for the strap. The sash will be a strip 102" x 7".


     To assemble, iron the interfacing to the one of the circles. Place right sides together and pin. I'm not normally a gal to use pins much, but in this case, I think it is super helpful to do so. Satin is slippery and circles can be weird to sew sometimes.


     Sew around the edges and leave an opening to flip it right side out.


      After you flip it right sided out, iron around the edges. That's another unheard of thing for me to do...iron...but, really, you need to do it here.


     Once it is all ironed all tidy like, top stitch around the whole thing.


     OK, now you need to make some button holes. Take a deep breath...you need to make 37.  Its not that bad really! Actually, this is the first time I've ever made something using a button hole...and of course I needed 37 of them. Nothing like over kill or anything. Point being, I survived them and you will too. I made a 7/8" button hole every three inches. Make the button hole an inch and a half from the edge.

      Once you've finished all of them, cut them open. I fray checked them all just for good measure.


     By the way, if you make this using a different size circle, make sure you have an ODD number of button holes. It has to be on odd number for the sash to be able to tie in the front. Now you need to fold your sash, wrong sided out.


       Sew along the raw edge. (Don't cut your ends like this, I chopped these straight later)


      Iron it flat with the seam in the middle of one side. Ironing twice in one day! Someone check my temperature!


     Thread your sash in and out of the button holes, gathering the top as you go.


     Make the opening as large or small as you like and tie the excess.


     Sew the shorter piece you cut for your handle just like you did the sash. Tie it to one of the inside loops on either side of the bag. This makes it so, if you feel like reversing the bag and using the other side, you can just untie everything and flip the bag.


     All finished. See? I told you that wasn't hard! It maybe wasn't quite as fast as I had in mind, but it certainly fits the ticket for simple.


     It even looks great from the side!


     I really like the idea of switching out the sash to another color if the mood ever strikes me. In the meantime, I'm pretty satisfied.


" O give thanks unto the Lord; call upon his name: make known his deeds among the people."
Psalm 105:1

Linking to:
Tatertots and Jello
Lolly Jane
Be Different Act Normal
Six Sisters' Stuff
Under the table and dreaming
Between Naps on the Porch
Goodbye City Hello Suburbs
My Girlish Whims